
버글버글
Java 수업 기록 (27) Thread 본문
▶ 스레드 (Thread)
1. 세부 실행 단위
2. 자바 실행의 기본 단위(여태까지 사용했던 스레드는, main 스레드 이다)
3. main 스레드 이외의 스레드 추가 가능
* 스레드 생성
1. Thread 클래스 상속
2. Runnable 인터페이스 구현
* Thread 클래스 상속
1. extends Thread
2. Thread 클래스의 public void run() 메소드를 오버라이드해서 수행할 작업
(오버라이드를 하는 이유는, 약속이기 때문이다.)
* 스레드 실행
1. start() 메소드를 호출
2. start() 메소드를 호출하면 run() 메소드에 오버라이드 한 내용이 실행
** run() 메소드를 만들었지만, run()메소드가 아니라 start()메소드를 호출해야 함**
예시) 클래스
public class Process extends Thread {

	private String name;

	public Process(String name) {
		super();
		this.name = name;
	}

	@Override
	public void run() {
		try {
			Thread.sleep(3000);
			System.out.println(name + " 작업 실행");
		} catch (InterruptedException e) {
			e.printStackTrace();
		}
	}
}
millis = 1/1000초
1초 = 1000/1000초
public class Main {

	public static void main(String[] args) {

		System.out.println("main 시작");

		Process process = new Process("연산");
		process.start();	// Process 클래스의 오버라이드된 run() 메소드가 호출

		System.out.println("main 종료");

	}

	// main 시작
	// main 종료
	// 연산 작업 실행
Main 에서 실행을 하면, main 시작 > main 종료 > 연산 작업 실행이 된다.
Main()메소드 에서는 Main()만 진행하고,
Process는 Process에서 진행하기 때문에 순서의 차이가 발생한다.
여기서 Process를 하나 더 생성하고 호출하면, 다른 프로세스가 생성되는 것이다.
실행 순서는 바뀔 수 있다. (아래 예시 참고)
public class Main {

	public static void main(String[] args) {

		System.out.println("main 시작");

		Process process = new Process("연산");
		process.start();	// Process 클래스의 오버라이드된 run() 메소드가 호출


		Process process2 = new Process("제어");
		process2.start();

		System.out.println("main 종료");

	}

}

// main 시작
// main 종료
// 제어 작업 실행 (연산이 먼저 나오지만, 제어가 먼저 실행되었다.)
// 연산 작업 실행
* 스레드의 우선순위
		System.out.println("가장 높은 우선순위: " + Thread.MAX_PRIORITY);	// 10
		System.out.println("가장 낮은 우선순위: " + Thread.MIN_PRIORITY);	// 1
		System.out.println("보통 우선순위: " + Thread.NORM_PRIORITY);		// 5
예시)
public class Main {

	public static void main(String[] args) {

		// 스레드 우선순위
		System.out.println("가장 높은 우선순위: " + Thread.MAX_PRIORITY);
		System.out.println("가장 낮은 우선순위: " + Thread.MIN_PRIORITY);
		System.out.println("보통 우선순위: " + Thread.NORM_PRIORITY);

		// 스레드 2개(s1, s2)
		Soldier s1 = new Soldier("김상사", new Gun(6));
		Soldier s2 = new Soldier("장병장", new Gun(10));

		// 각 스레드의 우선순위
		System.out.println("s1 우선순위 : " + s1.getPriority());
		System.out.println("s2 우선순위 : " + s2.getPriority());

		// 스레드 실행
		s1.start();
		s2.start();
	}
}
- 위 코드를 실행해보면 스레드 2개는 우선순위가 5인걸로 나타난다. 그래서 아무거나 무작위로 실행 시킨다.
- 우선순위가 높은 스레드를 (무조건은 아님) 최대한 먼저 실행
		// 우선순위가 높은 스레드를 (최대한) 먼저 실행
		// 우선순위 조정
		s1.setPriority(Thread.MIN_PRIORITY); // 가장 낮은 우선순위
		s2.setPriority(Thread.MAX_PRIORITY); // 가장 높은 우선순위
▶ Runnable
스레드 생성 방법
1. Runnable 인터페이스 구현
2. public void run() 오버라이드
* Runnable 인터페이스를 구현한 클래스는 Thread로 바꿔야 start() 메소드를 호출할 수 있다.
* join() : 스레드가 종료(die)될때까지 기다림
예시)
public class Robot {

}
public class WashRobot extends Robot implements Runnable {
private String name;
public WashRobot(String name) {
super();
this.name = name;
}
@Override
public void run() {
System.out.println(name + " 빨래중");
}
}public class Main {
public static void main(String[] args) {
// Runnable 인터페이스를 구현한 클래스는 Thread로 바꿔야 start() 메소드를 호출할 수 있다.
Runnable robot1 = new WashRobot("로봇1"); // Thread thread3 = new Threae(new WashRobot("로봇1")); 과 같음.
WashRobot robot2 = new WashRobot("로봇2");
Thread thread1 = new Thread(robot1);
Thread thread2 = new Thread(robot2);
thread1.start();
thread2.start();
}
}예시2)
public class Calculator implements Runnable {

	private int total;
	private int begin;
	private int end;

	public Calculator(int begin, int end) {
		this.begin = begin;
		this.end = end;
	}

	public int getTotal() {
		return total;
	}
	public void setTotal(int total) {
		this.total = total;
	}

	public void add() {
		for(int n = begin; n <= end; n++) {
			total += n;
		}
	}

	@Override
	public void run() {
		add();
	}

}
public class Main {
public static void main(String[] args) {
// Calculator를 2개 준비
// 작업을 반으로 나눠서 진행
// Calculator가 동시에 연산을 수행하려면 Calculator를 스레드로 처리해야 함
Calculator calc1 = new Calculator(1, 5000);
Thread thread1 = new Thread(calc1);
thread1.start();
Calculator calc2 = new Calculator(5001, 10000);
Thread thread2 = new Thread(calc2);
thread2.start();
System.out.println(calc1.getTotal() + calc2.getTotal()); // 0
}
}결과 값이 0이 나오는 이유는 Calculator는 계산 중인거고, main은 main대로 실행해서 Total을 호출한거다.
그래서 계산이 안된 Total 값이 출력되는 것이다.
아래와 같은 코드로 수정하면, 계산할 떄까지 기다렸다가 출력 해 준다. (join())
public class Main {

	public static void main(String[] args) {

		// Calculator를 2개 준비
		// 작업을 반으로 나눠서 진행

		// Calculator가 동시에 연산을 수행하려면 Calculator를 스레드로 처리해야 함

		Calculator calc1 = new Calculator(1, 5000);
		Thread thread1 = new Thread(calc1);
		thread1.start();	// 1번째 계산기 동작 시작

		Calculator calc2 = new Calculator(5001, 10000);
		Thread thread2 = new Thread(calc2);
		thread2.start();	// 2번째 계산기 동작 시작

		// 모든 계산기의 동작이 끝날때까지 기다린다.
		try {
			thread1.join();
			thread2.join();
		} catch (InterruptedException e) {
			e.printStackTrace();
		}
		System.out.println(calc1.getTotal() + calc2.getTotal());
	}
}
▶ Synchronized
1. 스레드 충돌 방지를 위해서 한 번에 한 스레드만 접근할 수 있도록 허용
2. 공유 자원의 일관성을 보장
3. 한 번에 한 스레드만 접근할 수 있는 영역을 임계 영역(Critical Section)이라고 함
아래 예시는 스레드 충돌 예시이다.
public class Main {

	public static void main(String[] args) {

		// 클리너 1개
		Cleaner cleaner = new Cleaner();

		// 로봇 2개(동일한 클리너를 가짐)
		ToiletRobot robot1 = new ToiletRobot(cleaner);
		RoomRobot robot2 = new RoomRobot(cleaner);

		// 청소 시작
		robot1.start();
		robot2.start();
	}
}

public class Cleaner {

	public void toiletCleaning() {
		System.out.println("화장실 청소");
	}

	public void roomCleaning() {
		System.out.println("방 청소");
	}
}


public class RoomRobot extends Thread {

	private Cleaner cleaner;

	public RoomRobot(Cleaner cleaner) {
		super();
		this.cleaner = cleaner;
	}

	@Override
	public void run() {
		for(int i = 0;i < 5; i++) {
			cleaner.roomCleaning();
		}
	}
}

public class ToiletRobot extends Thread {

	private Cleaner cleaner;

	public ToiletRobot(Cleaner cleaner) {
		super();
		this.cleaner = cleaner;
	}

	@Override
	public void run() {
			for(int i = 0;i < 5; i++) {
				cleaner.toiletCleaning();
			}
	}
}
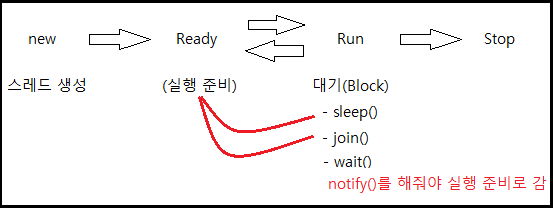
▶ Wait()
1. 오브젝트 클레스의 메소드다.
2. 스레드가 대기 상태가 됨
3. 다른 스레드가 깨울때까지 대기함
4. 예외 처리가 필요함 (InterruptedException)
▶ Notify()
1. 오브젝트 클레스의 메소드다.
2. 다른 스레드를 깨움
3. notifyAll() 메소드로 모든 스레드를 깨움
Wait()과 Notify()의 예시)
public class Cleaner {

	public synchronized void toiletCleaning() {
		try {
			System.out.println("화장실 청소");
			notify();	// "나 화장실 청소 끝났다"고 알림
			wait();		// 잠깐 쉼
		} catch (InterruptedException e) { // wait() 메소드는 예외 처리 필요
			e.printStackTrace();
		}
	}

	public synchronized void roomCleaning() {
		try {
			System.out.println("방 청소");
			notify();	// "나 방 청소 끝났다"고 알림
			wait();		// 잠깐 쉼
		} catch (InterruptedException e) {
			e.printStackTrace();
		}
	}

}
▶ 기타사항
| A a = new A(); | = | B b = new B(new A()); |
| B b = new B(a); |
왼쪽을 합친 코드와 오른쪽은 같은 코드다.
'java > java 수업 기록' 카테고리의 다른 글
| Java 수업 기록 (26) Network (0) | 2022.08.18 |
|---|---|
| Java 수업 기록 (25) IO - InputStream (0) | 2022.08.17 |
| Java 수업 기록 (24) IO - OutputStream (0) | 2022.08.16 |
| Java 수업 기록 (23) IO - Reader (0) | 2022.08.15 |
| Java 수업 기록 (22) IO - Writer (0) | 2022.08.14 |


